Easter Bowl

Difficulty: 2
Technique: crocheted

Crocheted bowl for Easter eggs

This tutorial will show you how to create a small bowl for an Easter egg that you can either use every day when serving breakfast or at Easter to display your prettiest Easter egg. You can use PRECIOSA PermaLux seed beads to create a wide variety color combinations.

Ambassadors

Alexandra Lysenko - Snow Mirna

Her name has resounded throughout the world of bead and seed bead costume jewellery for a number of years.

Learn More

Material and Tools

Tools

Crocheting yarn; a Big Eye needle or a stringing needle with an eye consisting of a fine line; a 1.25 mm hook; cling film; scissors  

Tools

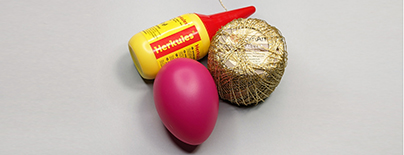
Zlatka or YarnArt Metallic embroidery yarn; glue; a 6 cm plastic egg
Procedure

Step 1

First string the pattern

String the beads either according to fig. no. 1b from the top in the direction from left to right or use fig. no. 1a, where every square with a letter indicates the seed bead color (the adjacent number indicates the number of seed beads in the given color). Only string the colors with the letters b, e, f, j and a and ignore the white squares.
Once the stringing is complete, you can start embroidering the row connection (fig. no. 1c).

1 / a

Step 2

Crochet using the following sequence:

row 1 – 6 stitches without any seed beads
row 2 – 6 seed beads and 6 stitches without any seed beads
row 3 – 12 seed beads and 6 stitches without any seed beads
row 4 – 18 seed beads and 6 stitches without any seed beads
row 5 – 24 seed beads and 6 stitches without any seed beads
row 6 – 30 seed beads and 6 stitches without any seed beads
row 7 – 36 seed beads and 6 stitches without any seed beads
row 8 – 42 seed beads and 6 stitches without any seed beads
rows 9 to 18 – 48 seed beads (crochet into every stitch in the row - don't leave any empty stitches).

Create the initial stitch (fig. no. 2a), then two 2 chain stitches without any seed beads (fig. no. 2b). Then crochet 6 crochet stitches to the first stitch in the chain (fig. no. 2c).

2 / a

Step 3

Move 6 seed beads from above for the first row (fig. no. 3a), pass the hook through the first stitch and then make crochet stitches into every stitch in the first row: one stitch with a seed bead and the second without until you only have the last seed bead left (fig. no. 3b). Use the last seed bead from the second row to connect the rows: add the last seed bead to the second row and then poke the hook into the first stitch in the third row (fig. no. 3c), hook the yarn (fig. no. 3d) and pull the third stitch through the two stitches that you have on your hook (fig. no. 3e) – you have now connected the second row and this is the method for connecting every row.

3 / a

Step 4

Create a chain stitch without any seed beads at the beginning of the 3rd row (fig. no. 4a). Move 12 seed beads for the third row (fig. no. 4b). Crochet one stitch with a seed bead into the first stitch from the second row and then crochet two stitches into the empty stitch, one with a seed bead and the second without, and move along the entire row and connect the rows at the end (fig. no. 4c).

4 / a

Step 5

Always crochet a chain stitch without a seed bead at the start of each row.

In the 4th row, crochet one stitch with a seed bead into both the first and second stitches, then crochet two stitches into the empty stitch, one with a seed bead and the second without, and move along the entire row and connect the rows at the end. You will have a total of 3 seed beads in the base (fig. no. 5a).

In the 5th row, crochet one stitch with a seed bead into the first to third stitches and then crochet two stitches into the empty stitch, one with a seed bead and the second without, and move along the entire row and connect the rows at the end. You will have a total of 4 seed beads in the base (fig. no. 5b).

In the 6th row, crochet one stitch with a seed bead into the first to fourth stitches and then crochet two stitches into the empty stitch, one with a seed bead and the second without, and move along the entire row and connect the rows at the end. You will have a total of 5 seed beads in the base (fig. no. 5c).
 

5 / a

In the 7th row, crochet one stitch with a seed bead into the first to fifth stitches and then crochet two stitches into the empty stitch, one with a seed bead and the second without, and move along the entire row and connect the rows at the end. You will have a total of 6 seed beads in the base (fig. no. 5d).

In the 8th row, crochet one stitch with a seed bead into the first to sixth stitches and then crochet two stitches into the empty stitch, one with a seed bead and the second without, and move along the entire row and connect the rows at the end. You will have a total of 7 seed beads in the base (fig. no. 5e).

/ a

Step 6

In the 9th row, crochet one stitch with a seed bead into each stitch (don't add any empty stitches), fig. no. 6a. You will have a total of 8 seed beads in the base. Crochet another 9 rows (fig. no. 6b). Crochet the last row without any seed beads using the metallic yarn (fig. no. 6c).

6 / a

Step 7

Wrap the plastic egg in the cling film (fig. no. 7a). Apply some glue to the interior of the bowl (fig. no. 7b). Insert the egg into the bowl (fig. no. 7c) and give it 12 to 24 hours to dry by the radiator. Once the glue has dried, carefully remove the egg and the film (fig. nos. 7d - 7e). Cut off any excess yarn (fig. no. 7f).

7 / a

Downloads